File Gateway Installation Guide
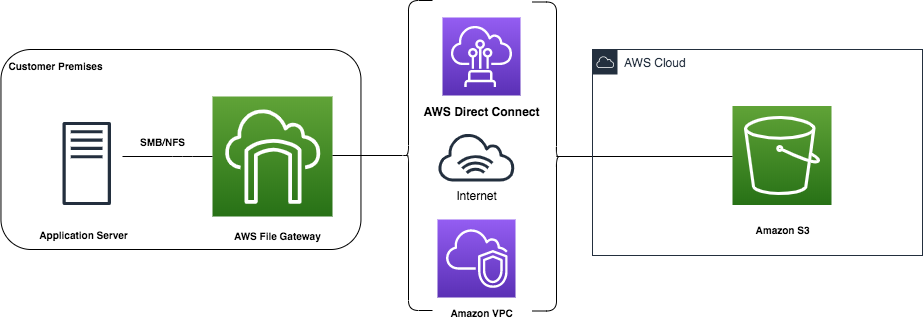
An Amazon S3 File Gateway enables you to share files between your on-premises components and the company's components within your solution deployed in AWS. For example, asset metadata is collected and managed in your on-premises data management system. The asset metadata must be sent to the company's asset processing component for further processing and use by other company components. In this example, the S3 File Gateway provides you with a local network drive location to drop the asset metadata and eliminates a complex integration between your on-premises components and the cloud components in your solution.
The solution consists of:
- an S3 File Gateway: software provided by AWS, which you must install and configure in a virtual machine within your network
- an AWS gateway configuration: a configuration within AWS maintained by the company
- an AWS file share configuration: an SMB/NFS configuration within AWS maintained by the company
- one or more AWS S3 buckets: storage in AWS, configured and maintained by the company
1 - Prerequisites
Before you install the S3 File Gateway, make sure that the following prerequisites are met:
- Microsoft Active Directory service account with the correct permissions. For more information, see Active Directory service account permission requirements - AWS Storage Gateway
- One of the following hypervisors to deploy the virtual machine appliance:
- Sufficient bandwidth between your network and AWS (at least 100 Mbps)
- Hardware:
Four virtual processors assigned to the VM
16 GB of reserved RAM for File Gateways
80 GB of disk space for installation of VM image and system data
150 GB for an additional cache disk for your VM
For more information, see Hardware and storage requirements
For more information on prerequisites, see File Gateway setup requirements - AWS Storage Gateway.
2 - Installation process
As a customer, you do not have access to the AWS console where the company deploys the components needed for your solution. As a result, certain steps in setting up the S3 File Gateway are executed by a company representative. The following diagram illustrates the stages in the process and who executes them:
flowchart
    subgraph Customer
        direction TB
        st0((START)) --> st1
        st1(Request link to S3 File Gateway virtual machine image)
        st3(Install and configure S3 File Gateway virtual machine image) --> st4(Test S3 File Gateway connectivity)
        st4 --> st5{Success?}
        st5 -- no --> st6a(Configure firewall and router to access service endpoints)
        st6a --> st4
        st5 -- yes --> st6b{Provide the company with access to VM?}
        st6b -- no --> st7b(Set up second machine with AWS CLI and cURL)
        st7b --> st8(Request AWS credentials)
        st11(Set up credentials on secondary machine) --> st12(Run commands on secondary machine to configure and activate S3 File Gateway)
        st12 --> st13(Notify the company of successful setup)
    end
    subgraph The company
        direction TB
        st2(Provide URL to customer)
        st7a(Configure and activate S3 File Gateway) --> st15((END))
        st9(Set up temporary AWS user) --> st10(Send credentials and information to customer)
        st14(Remove temporary AWS user) --> st15
    end
    st1 --> st2
    st2 --> st3
    st6b -- yes --> st7a
    st8 --> st9
    st10 --> st11
    st13 --> st14
2.1 - Install S3 File Gateway virtual machine
In this stage, you request where to download the S3 File Gateway and install in your hypervisor.
- Contact your designated company representative, and request the URL to the file gateway and the AWS region. Provide the hypervisor you have with your request to receive the correct URL. Only the following hypervisors are supported:
- VMware ESXi Hypervisor
- Microsoft Hyper-V Hypervisor
- Linux Kernel-based Virtual Machine
- Download the S3 File Gateway virtual machine (VM) image and install it in your hypervisor. Ensure the following minimum setup:
- Processors: 4
- RAM: 16 GB
- Disk for VM image and system data: 80 GB
- Additional cache disk: 150 GB
- Network adapter: NAT
2.2 - Test network connection
In this stage, you must test the network connection to your S3 File Gateway.
Log into your virtual machine. A screen similar to the following is displayed:

Enter the command to “Test Network Connectivity” and press Enter.
Select the “Public” endpoint type and press Enter.
Enter the AWS region, which you have received from your designated company representative, and press Enter.
If the test is successful, continue with the procedure.

If the test is unsuccessful, then configure your firewall and router to allow traffic from the AWS service endpoints described here: Allowing AWS Storage Gateway access through firewalls and routers.
Perform the test again to verify access after the firewall and router configuration.
2.3 - Configure and activate gateway
In this stage, the S3 File Gateway is configured and activated. How this happens depends on whether or not the company is granted access to the virtual machine where you installed the S3 File Gateway.
The company can have access to VM
If you allow the company, even temporary, access to the virtual machine where you installed the S3 File Gateway, then the company can configure and activate the S3 File Gateway.
Inform your designated company representative that you have successfully installed and tested the S3 File Gateway virtual machine. Provide the following information:
- How to connect to the virtual machine (IP address).
- How to access your network, in case the virtual machine is within a restricted network.
- The credentials to log into the virtual machine.
If the S3 File Gateway virtual machine is in a restricted network, then provide and request the information needed to allow the company access to the restricted network. For example, you may have to open your network to specific IP addresses from the company, which the company needs to provide to you.
The company cannot have access to VM
If you cannot provide access to the virtual machine to the company, then you must execute the following steps to configure and activate the S3 File Gateway in AWS:
Request AWS credentials and S3 File Gateway information from your designated company representative. You receive the following information:
aws_access_key_id: the access key ID of the AWS useraws_secret_access_key: the access key of the AWS userregion: the region where the File Gateway will be activated (the region is the same as the region you tested against in the previous stage)gateway-name: the name of the File Gateway in AWSactivation-key: the activation key of the File Gateway in AWS
Create a new virtual machine within the same network as the File Gateway virtual machine with the following tools installed:
Log into your new virtual machine
Set up the AWS CLI credentials file with the following information:
[gwinstall]
aws_access_key_id = <aws_access_key_id provided by the company>
aws_secret_access_key = <aws_secret_access_key provided by the company>
Set up the AWS CLI configuration file with the following information:
[profile gwinstall]
region = <region provided by the company>
Run the following AWS CLI command to activate the gateway:
aws activate-gateway \
--activation-key <activation-key provided by the company>\
--gateway-name <gateway-name provided by the company>\
--gateway-timezone <timezone of the File Gateway VM>\
--gateway-region <region provided by the company>\
--profile gwinstall
This command outputs the AWS File Gateway ARN, which is needed in the following command:
{
    "GatewayARN": "arn:aws:storagegateway:<region>:<account#>:gateway/sgw-<gateway-id>"
}
Run the following AWS CLI command to list the disks in your File Gateway VM:
aws --profile gwinstall storagegateway list-local-disks --gateway-arn <GatewayARN>
The command outputs the list of disks in your File Gateway VM:
{
    "GatewayARN": "<GatewayARN>",
    "Disks": [
        {
            "DiskId": "92e81768-7ac1-4523-9c59-1043a27121cb",
            "DiskPath": "/dev/sdb",
            "DiskNode": "SCSI (0:1)",
            "DiskStatus": "present",
            "DiskSizeInBytes": 161061273600,
            "DiskAllocationType": "AVAILABLE",
            "DiskAttributeList": []
        }
    ]
}
Run the following AWS CLI command, using the DiskId from the output from the previous command, to identify the cache disk of the File Gateway to the setup in AWS:
aws --profile gwinstall storagegateway
              add-cache --gateway-arn <GatewayARN> --disk-ids
        "<DiskId>"
Notify your designated company representative that you have finalized AWS File Gateway configuration and activation, and request to verify the File Gateway in AWS. When you receive confirmation, you can continue with the next steps to request the AWS File shares necessary for your solution.
3 - Next steps
In the next steps, the company sets up one or more AWS File shares as needed for your solution and according to your network file sharing protocol:
- SMB, which is standard for Microsoft Windows environments
- NFS, which is standard for Linux environments
When the AWS File shares are available, the company provides you with the necessary commands to map the AWS File share to your local network folder and asks you to send a test file to test the setup.